

Gauges on the Dash
By Phil Lapin / Technical Committee and President
(Note: click on the images to enlarge.)
I have spent quite a bit of time “under the dash” on my 1942 Plymouth, and I thought I would share a few experiences from that. I’ll talk about the speedometer, gas gauge and extending flex cables.
First – the best tip I can give: pull the front seat cushion out, unbolt the seat and then move it backwards as far as you can go (at least in the sedans). Trying to do any significant work with the seat in place is agonizing!
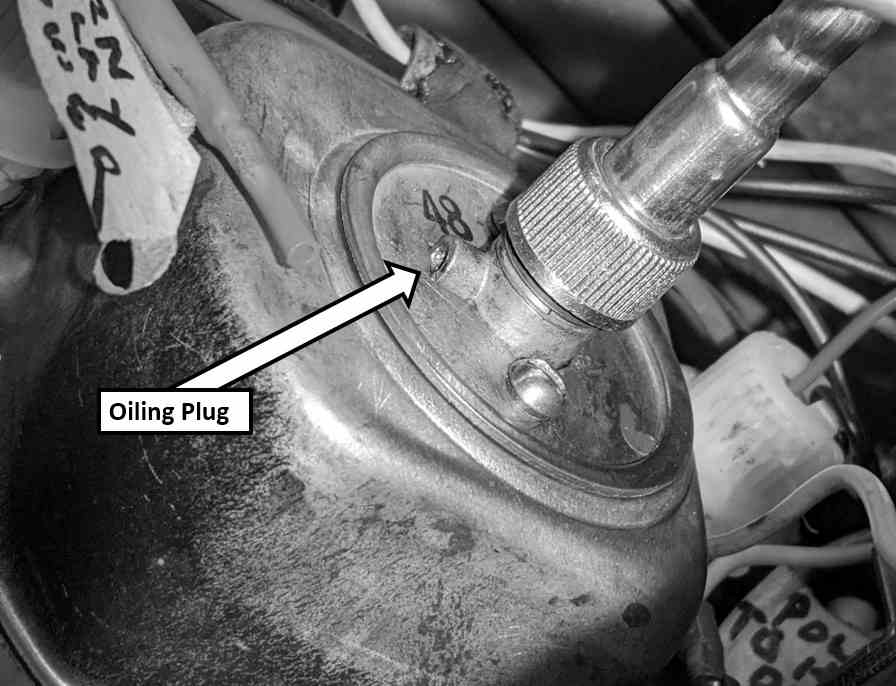 SPEEDOMETERS – The 1940’s cars seem very similar with these gauges. If your speedometer is jumping around, it may not be the cable causing issues. Rather, it is the oiling of the main shaft inside the speedo. On the back of the housing, near the cable input, there should be a small cast in hole with a brass plug in it (or a cap on it). This was the main problem with my unit – no oil for over 70 years. The plug must be removed to get oil in, and there was no way I could pry mine out with it in the car. Four screws hold the speedometer unit. It comes out fairly easily after removing the cable and light sockets. I then had to take off the back plate for full access to the plug. A drill slightly larger than the plug was used to grab onto the plug and pull it out. A dry wick was inside. “3 in 1” oil was put in, and the shaft began to move freely once again. If your odometer is not moving, the small metal gear in the unit may have come off. It is driven by a worm gear, and is riveted to an axle through the casting. I drilled the rivet hole in the axle, inserted a pin, and then put the metal gear onto the pin, soldering it in place. I also oiled the axle – which was completely frozen up. After re-assembly, everything works perfectly.
 GAS GAUGE – My gas gauge is an older style (input power and 2 sender unit wires on the back of it). It can be calibrated, although it is a frustrating task. It is easy to remove. There are two “arms” inside the gauge, each of which must be moved ever so slightly to alter the empty and full readings. They are supposed to be freed up by loosening up the power input nuts on the back of the gauge. I could not get mine loose easily, but eventually used a pair of needle nose pliers to adjust the arms. It is best to pull out the sending unit from the tank, and move the arm up and down while checking the gauge. With an 8” deep tank, you can measure how far up or down the float is. I got fairly close – but not perfect – with my gauge. I opted to have the empty reading the most accurate!
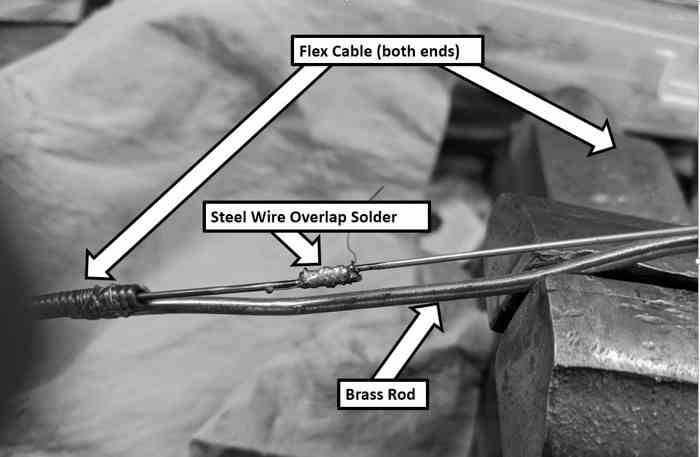 FLEXIBLE CABLES – I had a chrome defroster cable with a nice imprinted knob, but it was far too short to get to the middle of the dash for access. I wanted to keep it! I tried a fix which worked great to extend the cable. I took the short cable and left about 3” of internal wire sticking out. I then took a brand new piece of cable and also left a length of wire out of it. Then I used a piece of brass rod to make a span between the two cable pieces, soldering each end of the rod. The internal wires were overlapped and also soldered to each other. Instant long cable! Just be sure to leave enough space in the gap for the necessary travel of the wire. P.L.
