Installing a new headliner
by Phil Lapin / CPPC Technical Coodinator
Is it time to replace your headliner? Our 1942 Plymouth Sedan headliner was intact when we got it, but mice had made homes above it for years as it sat. It looked like the underside of a “mouse toilet” when we got the car! Replacement was an absolute necessity! I am completing the headliner project at this time, and have some tips and information which may be helpful.
Where to get a headliner made? Rather than using a local upholstery shop, there is a company named WLS Headliners (wlsheadliners.com) that specializes in headliners. They have patterns for most all classic cars, and can make a headliner for under $140. They have some 40 colors of fabric, and will send samples. Just call them to discuss your needs. This company also sells extra fabric and windlace – as well as offering a service of recovering sun visors. I was very pleased with both the speed and quality of what they made for me.
First off – most of the classic cars of the ‘30s through ‘50s had what is called a “bowstyle” headliner. This is easily recognized by the panels extending from side to side over the length of the roof interior. From the actual headliner upwards, there is the fabric you can see. Attached to the roof side of the fabric is a stitched in set of loops – just like the effect of a simple curtain that a rod goes through. These strips are called “listing”, and the metal bows holding the headliner up are slipped through these loops. On my 4 door sedan, there are 6 bows of varying widths to fit the roof. They are made of what appears to be tempered steel, and are basically flat in cross section. The bows are mounted into rubber grommets above the doors. Above the bows, there was a deteriorated fiber/paper “insulation” that was glued to the roof, and also held in place by the bows.
In addition to the actual headliner, there is typically the same fabric used on fiberboard pieces mounted between the door pillars, and at other places along the back seat side and the body. It is best to order a couple of yards of extra material to use for these areas.
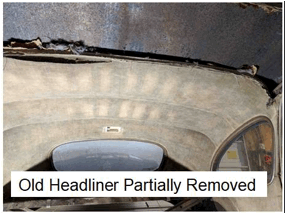
 Removal of the seats is highly advised, as you need room to move around to install a headliner. After seat removal, getting the old headliner down is the next challenge. I did NOT want it – or what was above it, falling on my head. Wearing a dust mask, I used a sharp knife to cut each panel out separately – by first cutting the edge away from me, and then the sides.- straddling the seam and bow. This allowed loose debris to fall in front of me rather than on top of me. The final step was to cut the closer panel seam and let it drop. This was repeated for all 6 panels, then the areas around the doors and windows were cut away. Take pictures at each step, and leave the cut fabric along the windows to see how it is attached. No need to remove it right away. After getting the panel areas down, the bows can be removed and stripped of the leftover fabric and listing. Be sure and mark the rods in order to get them back in properly.
Headliner edges are held in place by three main methods – tacks, adhesive and/or metal plates with teeth that hold the fabric. You will have to carefully take all this apart and make sure you understand how to re-assemble it in your specific vehicle. A pneumatic staple gun can replace tacks, and a thick glue like “Goop” can be used to anchor fabric without excessive mess.
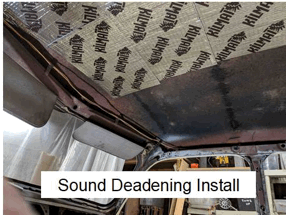
 After I had removed all of the “insulation” debris, I opted to cover the inside of the roof with a sound deadening material. I used “Kilmat” which I got through Amazon. It is a sticky butyl rubber about 1/16” thick, with a heavy foil on one side. The rubber is pressed against the bare roof interior, then each panel is rolled down (I used both a caster screwed onto a block of wood and a smooth stick to “burnish areas.) The effectiveness is amazing. This same material will be used on the floor, as well as side areas where possible.
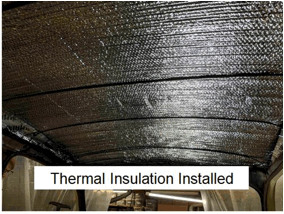
 After the sound deadening was in place, I used a roll of thermal material which I got at a “big box” store. It was 4’ wide by 10’ long, and is basically “bubble wrap” with foil on both sides. It went up against the roof easily, and was held in place with metal foil tape all around. The bows for the headliner press against it.
As for the actual installation of the headliner, the bows are first slipped through the listing. The assembly is then placed into the car. In my case, the rear bow is held in the proper position with a metal tab from the dome light. This keeps positioning accurate. The fabric is then carefully and evenly secured at the back window, and then front window – keeping the bows and fabric taut. Initially, just tack the material in a few places to make sure alignment and tension is proper. The sides are then pulled into position and attached using the already mentioned methods as required. The rear window opening is then cut in the headliner material (which has been covering it) – leaving enough material to glue around the window.
Can you install a headliner yourself? Absolutely! Just be patient and document everything as you begin removal, so it can be reversed in re-assembly. When I received my headliner from WLS Headliners, they included a comprehensive guide for installing headliners. Just think: No more stains, smells and holes – and all for under $200 including shipping and extra fabric!


