

Overdrive Indicator Lights
by Phil Lapin / CPPC Tech Committee
If you have a Borg Warner Overdrive unit in your vintage car (solenoid activated), you may sometimes wonder what it is doing. Is it up to a speed where it is possible to engage, is it engaged, or when going up hills, has it properly disengaged? If you are driving in town in slow traffic, can you instantly tell if it is in overdrive? Although there are ways to learn or “sense” what is happening – a simple set of indicator lights will make you much more confident about what is going on.
 I certainly did not “invent” the concept of indicator lights, but I worked through an easy way to set these up – and all from under the hood and into the dash area. I installed 3 LED lights to accomplish what I wanted, and each of them is a different color (red-orange-blue). You could also use small conventional lights, but the LEDs only need a 1/8 “ hole to hold them and they draw very little power.
A single light could be used simply to tell if the overdrive is engaged, but two or three are better as I will explain. In my setup, the first light comes on when the governor kicks in and allows the overdrive to function. The second light comes on when there is power to the solenoid – so NORMALLY the first two lights both go on and off at the same time.
What is nice is that if the second light does not come on, you know there is a problem with the relay. Assuming both the first and second lights are lit (and the OD dash lever is pushed in) the overdrive itself can engage. When you lift your foot off the gas briefly, the engagement occurs – and the third light comes on. At that point all three lights will be on. If more acceleration is needed and the gas pedal is pushed to the floor, the kickdown switch operates to disengage the overdrive – and the third light goes off! (since the picture in this article is in black and white, I can’t show the three differing colors – but they are easy to distinguish.) If no lights come on regardless of speed – the overdrive lever is probably pulled out, thus “locking out” the overdrive.
Hooking this all up is pretty simple. I am describing this as used in a positive ground vehicle. The first light (governor on) is wired between the “TH” terminal on the relay and a hot wire (-) under the dash. The second light (solenoid power) is connected between the “SOL” terminal on the relay and the positive (+) ground. The third (overdrive engaged) light is wired between the kickdown switch terminal with the wire from the solenoid #6 terminal and the hot wire (-) under the dash. The reason this third (overdrive engaged) light works is that the light is connected to the #6 wire out of the solenoid. This wire goes to ground ONLY when the solenoid is engaged – so it indirectly shows the engagement.
If LEDs are used, high ohm resistors should be used (2K) or higher on each to prevent the light from being too bright (experiment). You will also have to connect the LEDs according to the polarities needed to trigger them (which is not real intuitive with a positive ground system).
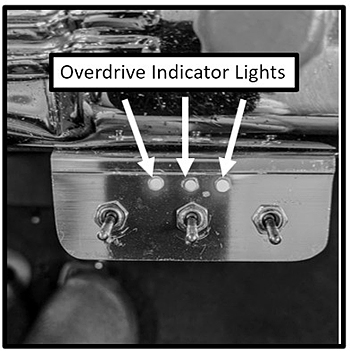
In my picture, the three lights are shown mounted into a small under dash panel. The three switches beneath them have nothing to do with the overdrive, but are switches to turn on various interior passenger lights.
PL
