

Carter BB carburetors
by Phil Lapin / CPPC Tech Committee
There is a long and well documented history on the Carter BB Carburetors – and my intent here is not to rehash that history. The carburetors were first introduced in the early 1930s, and there were close to 70 variations in them. These carburetors were used on most Chrysler Corporation vehicles of the 1930s through 1950s, as well on other vehicle brands, stationary and also marine engines. They are simple by today's standards, yet function quite well.
 There are rebuilding kits readily available for the Carter BB series, as well as shops capable of rebuilding them. A complete rebuild by a professional shop runs $300-400 in today's market. Shop manuals, instructions with kits and on-line resources can walk one through the complete rebuilding process using a kit.
I am not a pro on carbs, but I have now rebuilt several of these Carter units – and I have recognized a couple of potential problem areas that do not seem to be mentioned to any extent. They are easily understood problems.
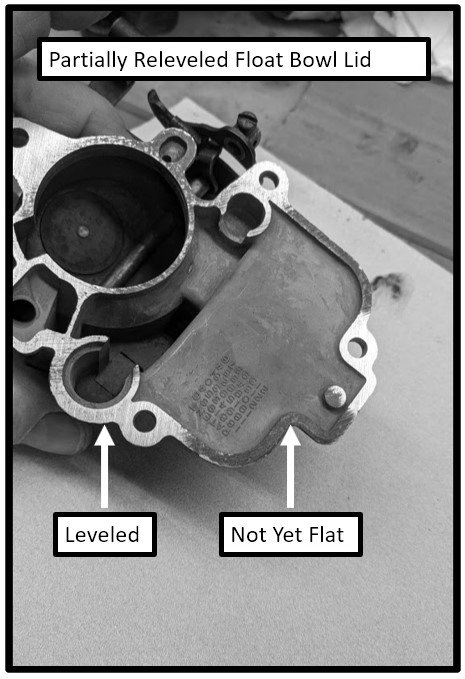
First, if the top of the carburetor is removed to do something as simple as clean out the float bowl, these two problems can present themselves. The "lid" portion of the top which covers and seals off the bowl can WARP over time. That area is a fairly thin zinc casting, and the whole top portion of the carburetor is held on by only four stout screws. When those screws are securely tightened to compress the gasket, the areas around the screws pull down and compress the gasket slightly. The other areas over the float bowl do not come down with equal pressure, and then tend to warp upwards (or one could say the screw areas warp downwards). The end result is that there is no longer a flat level surface to mate the "lid" to the body. I recently rebuilt one of these carbs, and noticed on disassembly that there were 2 gaskets used to form the seal. That did not register initially, but after rebuilding I put 1 new gasket in place then tightened the screws down. The gap in some areas was visible, and I could put my lips on the seam and blow air into the float bowl.
What needs to be done with this warped "lid" is to sand it to a perfectly flat surface prior to re-assembly. Using a stout piece of flat glass, a sheet of about 120 grit abrasive paper can be used to gradually relevel the part. I suspect I took off only about 1/100" of material to flatten it. Following that, the unit will reassemble well with one standard gasket and form a good seal.
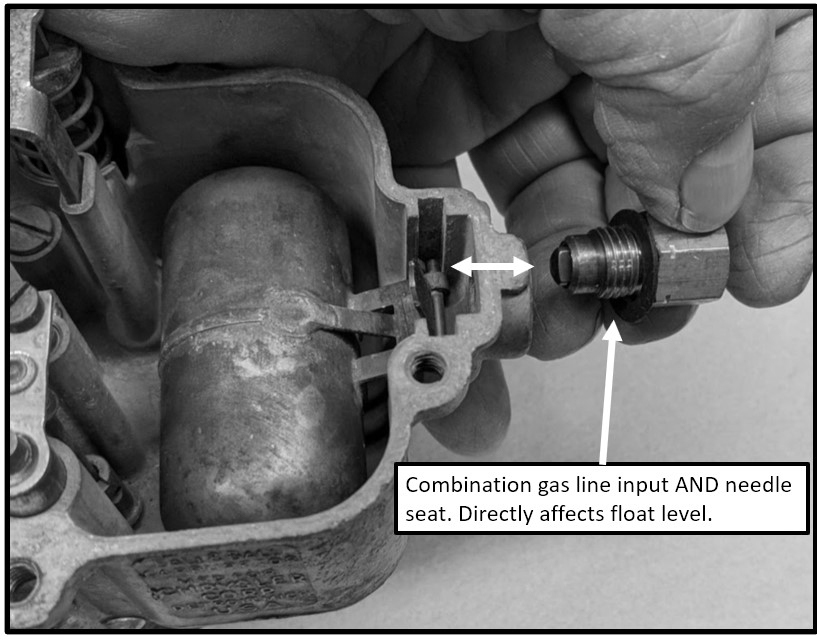 The second potential problem comes into play when putting a new float bowl needle in place, or adjusting the float itself. The gas line input to the carburetors is ALSO the fitting that holds the needle valve. If a new sealing washer is used on that fitting, or if the fitting is not held with a wrench when tightening the gas line back up, the needle will shift in or out. A small shift at this location will cause a much larger change in the float setting. It is best to re-attach the gas line before putting the lid back on the float bowl – and double check the float setting. Otherwise, you have no idea where your float level is when retightening the line.
